Git Basics 102
Wed Sep 10 2025
Views: Loading...
A continuation of Git Basics 101. This guide covers the basics of branches, merging, and addressing merge conflicts in Git.
Introduction#
Review from Git Basics 101#
From Git Basics 101, we learned that Git is a Free and Open Source Software (FOSS) Version Control System (VCS) developed by Linus Torvald in 2005. In this tutorial, we will assume that you have installed git. For more instructions, please review Git Basics 101.
Git’s Key Collaboration Feature#
While you can benefit from git by using the features covered in Git Basics 101, Git shines in its key collaboration feature: branching.
What are branches?#
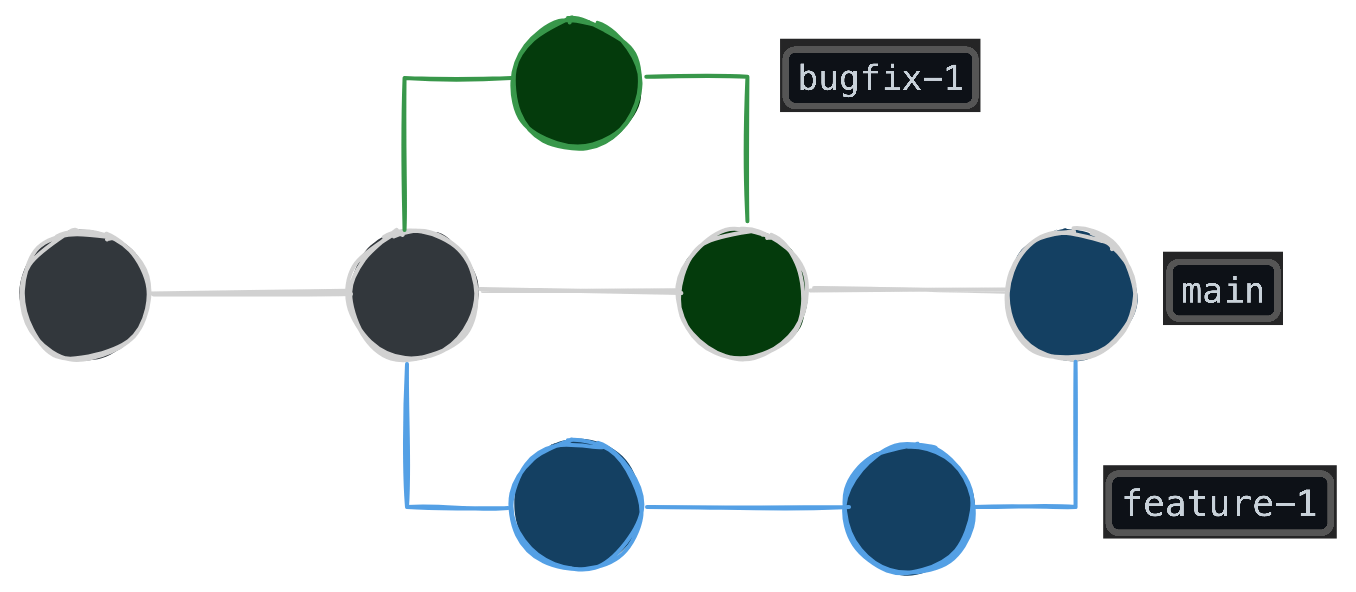
In Git, branches are essentially an independent series of commits. Internally, branches are stored as pointer to the latest (head) commit. This is possible becaue every commit ‘points’ to the previous commit it was based on in a tree-like structure.
All repositories begin with a main branch, which represents the primary series of commits that all branches are based on.
The head commit of this branch should represent a functional (but not always complete) snapshot of the repository.
Note 💡: If you are visiting an older repository, you may see other names for the main branch. Common names include
master,trunk, and many others. The current standard is to usemainfor new projects.
Why use branches?#
Branches provide an easy way to manage making different code changes at the same time independently.
To illustrate this use case, let’s imagine that you are working on a new feature for a project. Before finishing the feature you are working on it,
you realize that there’s a major breaking bug in the main branch.
You want to make a separate commit to fix this bug, but you also don’t want to commit the work-in-progress changes for that cool feature you
were working on. This is where branches come in!
With branching, you can make a new branch called cool-feature, and commit your current progress there. Once commited, the imcomplete feature
won’t be commited into main, but rather be saved in an independent series of commits that you can go back to later. Now, you can go back to
the main branch, make a new commit for the bugfix, and then go back to the cool-feature branch to finish that cool feature.
In this situation, branching made it super easy to work on the cool feature and bugfix without having one change interfere with the other.
Tutorial#
Let’s try out branching by working on a new feature!
Note 💡: This guide uses the Official Git Book as a reference point, but intends to be a more condensed guide.
Important ❗️: This guide assumes that you have the same repository from Git Basics 101. While the tutorial can be followed without this starting point, it is highly recommended to follow the tutorial series in order.
1. Change directories into the my-project folder.#
Windows:
cd %USERPROFILE%/my-project
MacOS/Linux:
cd $HOME/my-project
2. Verify that we are on the main branch.#
We can use the git branch command to check what branch we are on.
We should see the output * main as the only branch we have so far.
git branch
# Output:
# * main
3. Setup a new branch.#
3.1 Create a new branch based on main.#
We can use the git branch <branch-name> to create a new branch.
Let’s call it new-feature.
git branch new-feature
git branch
# Output:
# * main
#   new-feature
3.2 Switch to the new branch#
We still need to switch to this new branch to use it.
We can do this by using the command git switch <branch>
git switch new-feature
# Switched to branch 'new-feature'
git branch
# Output:
#   main
# * new-feature
(Shortcut) Create and checkout a branch at the same time.#
You can avoid writing two separate commands for creating and switching to a new branch.
This can be done with git switch -c <branch-name>
git switch -c new-feature
# Output
# Switched to a new branch 'new-feature'
git branch
# Output:
#   main
# * new-feature
Note 💡: In older git scripts, you may see the use of
git checkout. This command can be used similarly togit switch.
# Use two separate commands to create and switch
# to a new branch.
git branch new-feature
git checkout new-feature
# Output:
# Switched to branch 'new-feature'

# Use one single command to create and switch
# to a new branch
git checkout -b new-feature
# Output:
# Switched to a new branch 'new-feature'
4. Work on a new feature in the new-feature branch.#
Now that we have a new branch, we can start working on a new feature!
4.1 Edit the README.md file.#
Let’s add a new section to the README.md file.
echo >> README.md
echo "This is a new feature." >> README.md
cat README.md
# Output:
# # my-project
#
# A project using Git VCS
#
# This is a new feature.
4.2 Add and Commit the README.md changes.#
git add README.md
git commit -m "Add new feature to README.md"
# Output:
# [new-feature AAAAAAA] Add new feature to README.md
#  1 file changed, 2 insertions(+)

git log
# commit AAAAAAAAAAAAAAAAAAAAAAAAAAAAAAAAAAAAAAAA (HEAD -> new-feature)
# Author: Giovanni Rivera <rivera.giovanni271@gmail.com>
# Date:   Tue Sep XX XX:XX:XX 20XX#
#
#    Add new feature to README.md
#
# commit ZZZZZZZZZZZZZZZZZZZZZZZZZZZZZZZZZZZZZZZZ (HEAD -> main)
# Author: First Last <email@domain.tld>
# Date: Mon Sep XX XX:xx:xx 20XX
#
#     Revert "Accidental Commit"
#
#     This reverts commit YYYYYYYYYYYYYYYYYYYYYYYYYYYYYYYYYYYYYYYY
#
# commit YYYYYYYYYYYYYYYYYYYYYYYYYYYYYYYYYYYYYYYY
# Author: First Last <email@domain.tld>
# Date: Mon Sep XX XX:xx:xx 20XX
#
#     Accidental Commit
#
# commit XXXXXXXXXXXXXXXXXXXXXXXXXXXXXXXXXXXXXXXX
# Author: First Last <email@domain.tld>
# Date: Mon Sep XX XX:xx:xx 20XX
#
#     Create README.md file
5. Apply the changes from the new-feature branch to the main branch.#
Now that we have our fully-complete feature in the new-feature branch, we can
now add the changes to the main branch for all to see.
5.1 Switch to the main branch.#
We need to first go to the branch we want to apply the changes from the new-feature branch to.
git switch main
5.2 Merge the new-feature into the main branch.#
Now, we can merge our feature changes into the main branch to apply the changes.
This is possible by using the git merge <branch> [FLAGS...] command.
There are three main types of merges we can use:
Merge
git merge <branch>: Directly applies all commits in the specified branch to the current branch and adds a ‘merge’ commit at the end.- Pro: Git history is maintained, and all commits are appended to the current branch’s commit history.
- Con: Can clutter the git history with extra ‘merge’ commits.
Fast-Forward
git merge --ff <branch>: Directly appends all commits in the specified branch into the current branch. This can only be done if the specified branch is directly based on the current branch).- Pro: Super simple to use, and is the most preferable merging technique when updating a local repository.
- Con: It isn’t always possible to fast-forward if there is a lot of activity on either branch.
Squash & Merge
git merge --squash <branch>: Squashes all commits (I call these sub-commits) in the specified branch into a single commit.- Pro: The feature’s sub-commits can be represented in a single commit without any extra ‘merge’ commits.
- Con: You can’t selectively revert sub-commits in the previous branch when squashed.
Note 💡: There is a fourth merge type called Rebase & Merge
git rebase <branch>, but is used way less often. When you rebase a branch, new commits are placed before all commits made on the current branch, and the commits in the current branch are then re-applied after those commits.Essentially, rebase changes the root the current branch is based on to the last commit of the specified branch.
Rebase isn’t used often due to the fact that rebasing commits edits commit history, which can cause issues if more than one person is using the rebased branch. Rebase should be almost never be used, unless it is certain that you are the only one working on the rebased branch.
In our example, we will use Squash & Merge despite only making a single commit to avoid
creating a merge commit. This is the most common approach when merging a branch into main.
# Apply changes to the current branch (not automatically commited).
git merge --squash new-feature
# Output:
# Updating 1eb2087..bae8397
# Fast-forward
# Squash commit -- not updating HEAD
# README.md | 2 ++
# 1 file changed, 2 insertions(+)

# Commit the changes squashed from the `new-feature` branch.
git commit -m "Add new feature to README.md"
# Output:
# [main SSSSSSS] Add new feature to README.md
#  1 file changed, 2 insertions(+)
git log
# commit SSSSSSSSSSSSSSSSSSSSSSSSSSSSSSSSSSSSSSSS (HEAD -> main)
# Author: Giovanni Rivera <rivera.giovanni271@gmail.com>
# Date:   Tue Sep XX XX:XX:XX 20XX#
#
#    Add new feature to README.md
#
# commit ZZZZZZZZZZZZZZZZZZZZZZZZZZZZZZZZZZZZZZZZ
# Author: First Last <email@domain.tld>
# Date: Mon Sep XX XX:xx:xx 20XX
#
#     Revert "Accidental Commit"
#
#     This reverts commit YYYYYYYYYYYYYYYYYYYYYYYYYYYYYYYYYYYYYYYY
#
# commit YYYYYYYYYYYYYYYYYYYYYYYYYYYYYYYYYYYYYYYY
# Author: First Last <email@domain.tld>
# Date: Mon Sep XX XX:xx:xx 20XX
#
#     Accidental Commit
#
# commit XXXXXXXXXXXXXXXXXXXXXXXXXXXXXXXXXXXXXXXX
# Author: First Last <email@domain.tld>
# Date: Mon Sep XX XX:xx:xx 20XX
#
#     Create README.md file
Note 💡: Notice that the commit hash is not the same as the commit hash from before. This shows that the commit was indeed squashed and not directly applied.
Congratulations, you learned the basics of branches in Git!
Extra tips#
Merging (a.k.a Pulling) changes in the current branch from a remote repository to your local repository.#
If you have a remote repository (e.g. on GitHub), you can merge changes to the local repository.
In this context, merging changes from a remote repository to a local repository is called pulling.
It can be done with the command git pull <remote> <branch>. When pulling, the merge type is always
Merge.
# Pull changes from origin's main to local's current branch
git pull origin main
This is the equivalent of running the two following commands:
git fetch origin
git merge main
Dealing with Merge Conflicts#
When merging changes, you may run into a merge conflict. A merge conflict occurs when git can’t determine which of two conflicting changes to keep. A merge conflict will be in the format:
<<<<<<< HEAD
+ // Changes from the current branch
=======
+ // Changes from the branch being merged
>>>>>>> branch-name
To fix this merge conflict you need to do three things:
1. Resolve the conflict.#
Choose which of the changes to accept (or manually write a custom resolution) to the file and save the file.
2. Add the file to the staging area.#
Use git add to tell git that it that the merge conflict was fixed.
3. Finish the merge.#
Use git commit to tell git to try to merge again.
Note 💡: In the case of using rebase, you need to run
git rebase --continueto allow git to retry rebasing.Important ❗️: In the case you want to abort the merge, run
git merge --abort.
Next Steps#
Don’t stop learning about Git here! You can explore more features that Git provides here.
If you would like me to write more blog posts on advanced Git and/or GitHub features, feel free to contact me and let me know you would like to see more of these.
Happy learning!