Git Basics 101
Tue Sep 10 2024
Views: Loading...
A fundamental guide to using Git (and GitHub). This guide covers making a git repository, creating and reverting commits, and pushing the repository to GitHub.
Introduction#
What is Git?#
Git is a Version Control System (VCS) developed by Linus Torvald in 2005. It is primarily used through its Command Line Interface (CLI), but can also be used via community-made Graphical User Interfaces (GUIs).
What is a Version Control System (VCS)?#
Version Control Systems — sometimes known as Source Code Management (SCM) tools — are software solutions that provide an easy way to track and manage changes to source code over time.
While different VCS solutions are implemented in different ways, they all strive to provide an easy way to:
- Provide a centralized repository to store and share code
- Track source code history
- Faciliate code reviews and colaboration
- Ease the process of reverting mistakes and/or unwanted changes
Why should I choose Git?#
As Git is Free and Open Source Software (FOSS) and has a low difficulty curve, it’s no wonder why it is considered one of the most popular version control systems.
Git has an official website which has extensive documentation, as well as a large community of developers that can help make learning Git much easier than other solutions.
Prerequisites#
In order to use Git, you must first install it.
Download Binaries#
You can find the official Git binaries in the official downloads page.
Use your package manager#
If you have a package manager, you can also install Git directly there.
Windows#
- Winget:
winget install --id Git.Git -e --source winget
Macos:#
- Homebrew:
brew install git
Linux#
- Debian/Ubuntu:
apt-get install git
- Arch:
pacman -S git
For other Linux distributions and setup, please check Git’s official installation guide.
Tutorial#
Note 💡: This guide uses the Official Git Book as a reference point, but intends to be a more condensed guide.
1. Create a project directory#
Before using Git, you need to have a project directory (also known as a working directory or working tree). Open your terminal and create one:
Windows:
mkdir %USERPROFILE%/my-project
cd %USERPROFILE%/my-project
MacOS/Linux:
mkdir $HOME/my-project
cd $HOME/my-project
2. Initialize the Git Repository#
In order to track a directory with Git, you must initialize a Git Repository.
git init
# Initialized empty Git repository in .git/
3. Create a README.md file in the working directory#
Note 💡: The
README.mdmarkdown file is a conventional place to explain what a project is.
echo "# my-project" > README.md
echo >> README.md
echo "A project using Git VCS" >> README.md
cat README.md
# Output:
# # my-project
#
# A project using Git VCS
4. Track the README.md file#
4.1 Add README.md to the Staging Area#
In order to track our new README.md file, you tell Git that you want to add it to the Staging Area, where Git tracks the activity of new and existing files.
# Syntax: git add [...files]
git add README.md
4.2 Commit README.md to the Git Repository from the Staging Area#
Once added, you can commit added changes to the Git Repository with a custom messaged
(using the -m flag) to finalize the changes.
# Syntax: git commit [-m message]
git commit -m "Create README.md file"
# Output:
# [main (root-commit) XXXXXXX] Create README.md file
# 1 file changed, 3 insertions(+)
# create mode 100644 README.md
Tip ✅: If you are unsure at what step you are at in commiting changes, you can use the
git statuscommand.
git status
# Output:
# On branch main
#
# nothing to commit, working tree clean
#
# OR
#
# On branch main
#
# No commits yet
#
# Changes to be committed:
#   (use "git rm --cached <file>..." to unstage)
#	        new file:   README.md
4.3 View the newly added commit in Git’s log.#
After commiting a change, you can view the history of all committed changes.
git log
# Output:
# commit XXXXXXXXXXXXXXXXXXXXXXXXXXXXXXXXXXXXXXXX (HEAD -> main)
# Author: First Last <email@domain.tld>
# Date: Mon Sep XX XX:xx:xx 20XX
#
#     Create README.md file
Note 💡: Git’s
loguses Vim Key Binding (jto scroll down,kto scroll up,qto quit)
5. Reverting a mistake#
5.1. Introduce a mistake#
Let’s say that you were working on your project and made the following changes:
echo "This is a mistake" >> README.md
git add README.md
git commit -m "Accidental commit"
# Output:
# [main YYYYYYY] Accidental commit
#  1 file changed, 1 insertion(+)
git log
# Output:
# commit YYYYYYYYYYYYYYYYYYYYYYYYYYYYYYYYYYYYYYYY (HEAD -> main)
# Author: First Last <email@domain.tld>
# Date: Mon Sep XX XX:xx:xx 20XX
#
#     Accidental Commit
#
# commit XXXXXXXXXXXXXXXXXXXXXXXXXXXXXXXXXXXXXXXX
# Author: First Last <email@domain.tld>
# Date: Mon Sep XX XX:xx:xx 20XX
#
#     Create README.md file
Oh no, we have a mistake commited in the repository!
cat README.md
# # my-project
#
# A project using Git VCS
# This is a mistake
5.2 Revert the commit that had the accident#
In order to revert a commit, you must copy the commit hash as listed by
git log. In our case, it’s “YYYYYYYYYYYYYYYYYYYYYYYYYYYYYYYYYYYYYYYY”.
Once copied, you should run the following command:
# Syntax: git revert <commit hash>
git revert YYYYYYYYYYYYYYYYYYYYYYYYYYYYYYYYYYYYYYYY
# or just copy the first 6 characters from the hash
git revert YYYYYY
# Output:
# [main ZZZZZZZ] Revert "Accidental commit"
#  1 file changed, 1 deletion(-)
Now let’s look at the logs after reverting our change:
git log
# commit ZZZZZZZZZZZZZZZZZZZZZZZZZZZZZZZZZZZZZZZZ (HEAD -> main)
# Author: First Last <email@domain.tld>
# Date: Mon Sep XX XX:xx:xx 20XX
#
#     Revert "Accidental Commit"
#
#     This reverts commit YYYYYYYYYYYYYYYYYYYYYYYYYYYYYYYYYYYYYYYY
#
# commit YYYYYYYYYYYYYYYYYYYYYYYYYYYYYYYYYYYYYYYY
# Author: First Last <email@domain.tld>
# Date: Mon Sep XX XX:xx:xx 20XX
#
#     Accidental Commit
#
# commit XXXXXXXXXXXXXXXXXXXXXXXXXXXXXXXXXXXXXXXX
# Author: First Last <email@domain.tld>
# Date: Mon Sep XX XX:xx:xx 20XX
#
#     Create README.md file
We can also verify that the accident was reverted:
cat README.md
# Output:
# # my-project
#
# A project using Git VCS
Congratulations, you learned the basics of Git!
Extra tips#
Creating a remote repository#
Git is most useful when the code is being shared across multiple devices. A common free cloud solution for public Git repositories is GitHub.
1. Create a GitHub Account#
In order to use GitHub, you can go to GitHub’s Website and create an account.
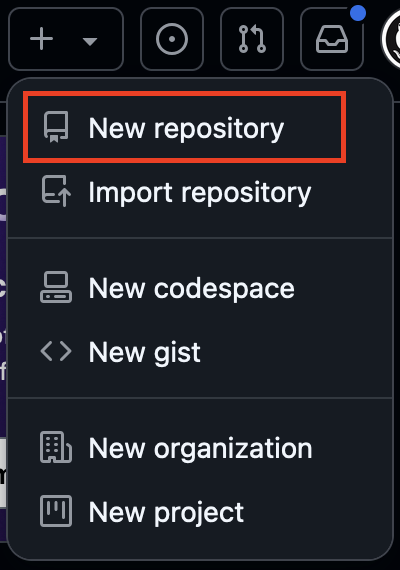
2. Create a New Repository#
Once created, you can create a GitHub repository by clicking the “+” symbol on your dashboard and selecting “New Repository”.
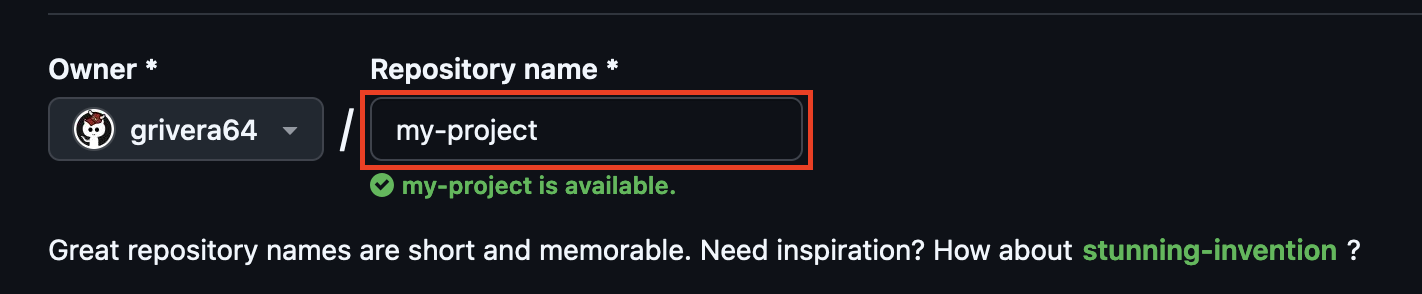
After selecting “New Repository”, you will be prompted to name your new repository and select other information. For now, we will just provide a name, then scroll down and click on “Create Repository”.
3. Link your Git Repository to the GitHub Repository#
Your current Git repository is local to your computer. In order to make it available on GitHub, you need to add a remote that points to your GitHub repository (also known as the remote repository).
To link your GitHub repository to your project repository, you must navigate to your project’s directory and use the following terminal commmand (filling in your username and repository name):
# Syntax: git remote add <remote-name> <link>.git
git remote add origin https://github.com/my-account/my-project.git
Note 💡: By convention, the remote name of
originis used. You can name it anything you want, but you must remember this name.
4. Push your local commits to the remote repository#
Now that we have our local repository linked to the remote repository, we now need to push our local commits to the remote repository:
# Syntax: git push [-u] <remote-name> <branch>
git push -u origin main
Important ❗️: This tutorial doesn’t focus on branches, but by default GitHub uses a
mainbranch as the default place that commits are made. Based on how you configured git, it may be set to a different default such asmasterortrunk.If you would like me to cover branches in future blog posts, feel free to contact me to let me know you are interested in these type of posts.
Now, if you visit the repository link, you will see your code is now publicly available online for other developers to view!
Next Steps#
Don’t stop learning about Git here! You can explore more features that Git provides here.
If you would like me to write more blog posts on advanced Git features (e.g branching, pulling, cloning, etc.), feel free to contact me and let me know you would like to see more of these.
Happy learning!